

Table of contents
- 1-Create Database
- 2-Create Project in Eclipse
- 3-Configure Spring Dispatcher Servlet and JPA configuration file
- 3-Create Controller Class and index.jsp by Testing deployment
- 4-Create the domain class Cliente to map with the table cliente in the database
- 5- We create services and repositories to LIST RECORDS FROM THE TABLE
- 6-Code to ADD new Client
- 7-Code to EDIT new Client
- 8-And finally we add the method DELETE client
In this tutorial, you will learn how to configure a Spring MVC application to work with Spring Data JPA. The application consists of a simple Crud that manages the clients of an organization.
Technologies used : Java 8, Apache Tomcat 9, MySQL Server 5.7, Eclipse STS 3.9IDE , Spring framework 5.1, Hibernate framework 5.4, Spring Data JPA 2.1.5 and Servlet 3.1.
1-Create Database
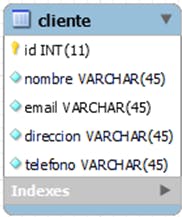
We use MySQL database. The sample application will manage data in a table named cliente which is in the schema named cliente_manager.
REATE DATABASE `cliente_manager`;
use  `cliente_manager`;
CREATE TABLE `cliente` (
  `id` int(11) NOT NULL AUTO_INCREMENT,
  `nombre` varchar(45) NOT NULL,
  `email` varchar(45) NOT NULL,
  `direccion` varchar(45) NOT NULL,
  `telefono` varchar(45) NOT NULL,
  PRIMARY KEY (`id`)
) ENGINE=InnoDB DEFAULT CHARSET=utf8;
2-Create Project in Eclipse
Create a Dynamic Web Project in Eclipse, and convert it to Maven project: right-click on the project, select Configure > Convert to Maven Project. The Create new POM dialog appears Enter the following information:
Group Id: com.cooweb
Artifact Id: ClienteManager
Configurate pom.xml Next, open the Maven's project file pom.xml to configure the dependencies for the project. This is the pom.xml generated, now configure and add dependencies
<project xmlns="http://maven.apache.org/POM/4.0.0"
 xmlns:xsi="http://www.w3.org/2001/XMLSchema-instance"
  xsi:schemaLocation="http://maven.apache.org/POM/4.0.0 http://maven.apache.org/xsd/maven-4.0.0.xsd">
  <modelVersion>4.0.0</modelVersion>
  <groupId>com.cooweb</groupId>
  <artifactId>ClienteManager</artifactId>
  <version>0.0.1-SNAPSHOT</version>
  <packaging>war</packaging>
<!-- En propiedades declaramos la version de spring y hibernate -->
    <properties>
        <spring.version>5.1.5.RELEASE</spring.version>
        <hibernate.version>5.4.1.Final</hibernate.version>
    </properties>
<dependencies>
        <!-- Core Spring context y spring web -->
        <dependency>
            <groupId>org.springframework</groupId>
            <artifactId>spring-context</artifactId>
            <version>${spring.version}</version>
        </dependency>
        <dependency>
            <groupId>org.springframework</groupId>
            <artifactId>spring-webmvc</artifactId>
            <version>${spring.version}</version>
        </dependency>
        <!-- Spring ORM and Spring DATA JPA -->
        <dependency>
            <groupId>org.springframework</groupId>
            <artifactId>spring-orm</artifactId>
            <version>${spring.version}</version>
        </dependency>
        <dependency>
            <groupId>org.springframework.data</groupId>
            <artifactId>spring-data-jpa</artifactId>
            <version>2.1.5.RELEASE</version>
        </dependency>
        <!-- Hibernate para que trabaje con JPA -->
        <dependency>
            <groupId>org.hibernate</groupId>
            <artifactId>hibernate-core</artifactId>
            <version>${hibernate.version}</version>
        </dependency>
        <!-- MySql -->
        <dependency>
            <groupId>mysql</groupId>
            <artifactId>mysql-connector-java</artifactId>
            <version>8.0.14</version>
            <scope>runtime</scope>
        </dependency>
        <!-- JSP and JSTL -->
        <dependency>
            <groupId>javax.servlet</groupId>
            <artifactId>javax.servlet-api</artifactId>
            <version>3.1.0</version>
            <scope>provided</scope>
        </dependency>
        <dependency>
            <groupId>javax.servlet.jsp</groupId>
            <artifactId>javax.servlet.jsp-api</artifactId>
            <version>2.3.1</version>
            <scope>provided</scope>
        </dependency>
        <dependency>
            <groupId>jstl</groupId>
            <artifactId>jstl</artifactId>
            <version>1.2</version>
        </dependency>
    </dependencies>
  <build>
    <sourceDirectory>src</sourceDirectory>
    <plugins>
      <plugin>
        <artifactId>maven-compiler-plugin</artifactId>
        <version>3.8.0</version>
        <configuration>
          <source>1.8</source>
          <target>1.8</target>
        </configuration>
      </plugin>
      <plugin>
        <artifactId>maven-war-plugin</artifactId>
        <version>3.2.1</version>
        <configuration>
          <warSourceDirectory>WebContent</warSourceDirectory>
        </configuration>
      </plugin>
    </plugins>
  </build>
</project>
3-Configure Spring Dispatcher Servlet and JPA configuration file
First, Create two Java packages under the source folder:
com.cooweb.config: for configuration classes.
com.cooweb.customer: for application-specific classes.
Create WebAppInitializer.java Now, we need to register the Spring Dispatcher Servlet upon application's startup by coding the following class.we need to create WebAppInitializer class wich is describe below
package com.cooweb.config;
import javax.servlet.ServletContext;
import javax.servlet.ServletException;
import javax.servlet.ServletRegistration;
 import org.springframework.web.WebApplicationInitializer;
import org.springframework.web.context.support.AnnotationConfigWebApplicationContext;
import org.springframework.web.servlet.DispatcherServlet;
public class WebAppInitializer implements WebApplicationInitializer{
    @Override
    public void onStartup(ServletContext servletContext) throws ServletException {
        AnnotationConfigWebApplicationContext appContext = new AnnotationConfigWebApplicationContext();
        appContext.register(WebMvcConfig.class);
 ServletRegistration.Dynamic dispatcher = servletContext.addServlet(
                "SpringDispatcher", new DispatcherServlet(appContext));
        dispatcher.setLoadOnStartup(1);
        dispatcher.addMapping("/");
            }
}

Create file persistence.xml Dado que se usar JPA, necesitamos especificar las propiedades de conexión de la base de datos en el archivo persistence.xml en lugar del archivo hibernate.cfg.xml . Cree un nuevo directorio llamado META-INF en la carpeta de origen para colocar el archivo persistence.xml de la siguiente manera
<?xml version="1.0" encoding="UTF-8"?>
<persistence xmlns="http://xmlns.jcp.org/xml/ns/persistence"
    xmlns:xsi="http://www.w3.org/2001/XMLSchema-instance"
    xsi:schemaLocation="http://xmlns.jcp.org/xml/ns/persistence
          http://xmlns.jcp.org/xml/ns/persistence/persistence_2_1.xsd"
    version="2.1">
    <persistence-unit name="cliente_manager">
        <properties>
            <property name="javax.persistence.jdbc.url" value="jdbc:mysql://localhost:3306/cliente_manager" />
            <property name="javax.persistence.jdbc.user" value="root" />
            <property name="javax.persistence.jdbc.password" value="" />
            <property name="javax.persistence.jdbc.driver" value="com.mysql.jdbc.Driver" />
            <property name="hibernate.show_sql" value="true" />
            <property name="hibernate.format_sql" value="true" />
        </properties>
    </persistence-unit>
</persistence>
As you can see, we specify database connection properties such as URL, user, password and JDBC driver class. Note that the persistence unit name sales will be used in the configuration code.
Configure Spring MVC Create the WebMvcConfig class under the com.cooweb.config package with the following code
package com.cooweb.config;
import org.springframework.context.annotation.Bean;
import org.springframework.context.annotation.ComponentScan;
import org.springframework.context.annotation.Configuration;
import org.springframework.web.servlet.view.InternalResourceViewResolver;
 @Configuration
@ComponentScan("com.cooweb")
public class WebMvcConfig {
    @Bean(name = "viewResolver")
    public InternalResourceViewResolver getViewResolver() {
        InternalResourceViewResolver viewResolver = new InternalResourceViewResolver();
        viewResolver.setPrefix("/WEB-INF/views/");
        viewResolver.setSuffix(".jsp");
        return viewResolver;
    }
}
In the last configuration stage we create the JpaConfig class. To enable Spring Data JPA, we need to create two beans: EntityManagerFactory and JpaTransactionManager. So create another configuration class named JpaConfig with the following code
package com.cooweb.config;
import javax.persistence.EntityManagerFactory;
import org.springframework.context.annotation.Bean;
import org.springframework.context.annotation.Configuration;
import org.springframework.data.jpa.repository.config.EnableJpaRepositories;
import org.springframework.orm.jpa.JpaTransactionManager;
import org.springframework.orm.jpa.LocalEntityManagerFactoryBean;
import org.springframework.transaction.annotation.EnableTransactionManagement;
@Configuration
@EnableJpaRepositories(basePackages = {"com.cooweb"})
@EnableTransactionManagement
public class JpaConfig {
     @Bean
        public LocalEntityManagerFactoryBean entityManagerFactory() {
            LocalEntityManagerFactoryBean factoryBean = new LocalEntityManagerFactoryBean();
            factoryBean.setPersistenceUnitName("cliente_manager");
            return factoryBean;
        }
        @Bean
        public JpaTransactionManager transactionManager(EntityManagerFactory entityManagerFactory) {
            JpaTransactionManager transactionManager = new JpaTransactionManager();
            transactionManager.setEntityManagerFactory(entityManagerFactory);
            return transactionManager;
        }
}
3-Create Controller Class and index.jsp by Testing deployment
Next, in the controller layer, create the ClienteController class to handle all requests from the clients with the following code:
package com.cooweb.cliente;
import org.springframework.beans.factory.annotation.Autowired;
import org.springframework.stereotype.Controller;
import org.springframework.web.bind.annotation.RequestMapping;
import org.springframework.web.servlet.ModelAndView;
 @Controller
public class ClienteController {
@RequestMapping("/")
    public ModelAndView home() {
       ModelAndView mav = new ModelAndView("index");
        mav.addObject("message", "Holamundo");
        return mav;
    }
}
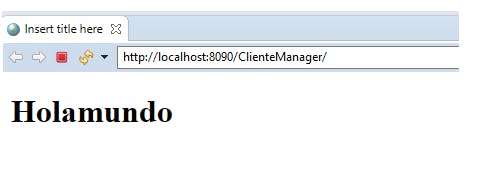
This is a typical Spring MVC controller class, which is annotated with the @Controller Y codifique la página de vista ( index.jsp ) de la siguiente manera:
<%@ page language="java" contentType="text/html; charset=ISO-8859-1"
    pageEncoding="ISO-8859-1"%>
<!DOCTYPE html>
<html>
<head>
<meta charset="ISO-8859-1">
<title>Insert title here</title>
</head>
<body>
   <h1>${message}</h1>
</body>
</html>
FINAL CONFIGURATION PROJECT
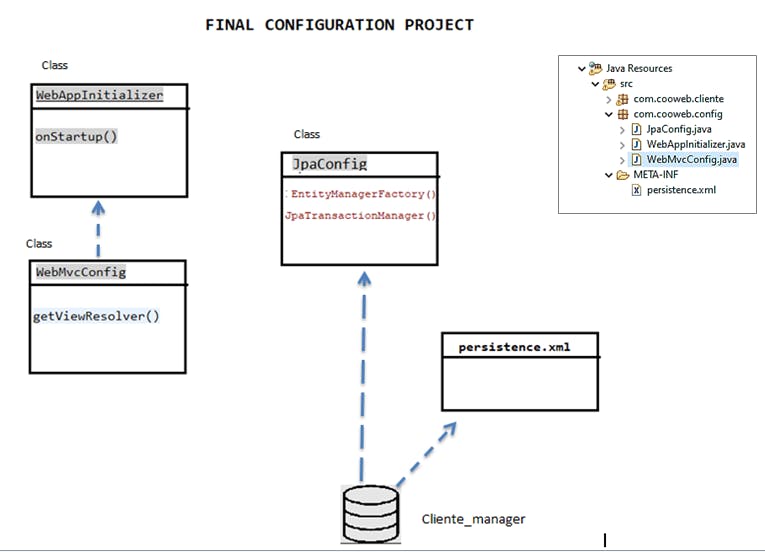
WE RUN THE APPLICATION WITH TOMCAT localhost:8090/ClienteManager
Terminado de configuraciones y deployments. Ahora viene la logica
4-Create the domain class Cliente to map with the table cliente in the database
package com.cooweb.cliente;
import javax.persistence.Entity;
import javax.persistence.GeneratedValue;
import javax.persistence.GenerationType;
import javax.persistence.Id;

@Entity
public class Cliente {

    @Id
    @GeneratedValue(strategy = GenerationType.IDENTITY)
    private Long id;
    private String nombre;
    private String email;
    private String direccion;
    private String telefono;

  //The constructor must be public or protected.
    protected Cliente() {}

    protected Cliente(Long id, String nombre, String email, String direccion, String telefono) {
        this.id = id;
        this.nombre = nombre;
        this.email = email;
        this.direccion = direccion;
        this.telefono = telefono;
    }
     //getter and setters
5- We create services and repositories to LIST RECORDS FROM THE TABLE
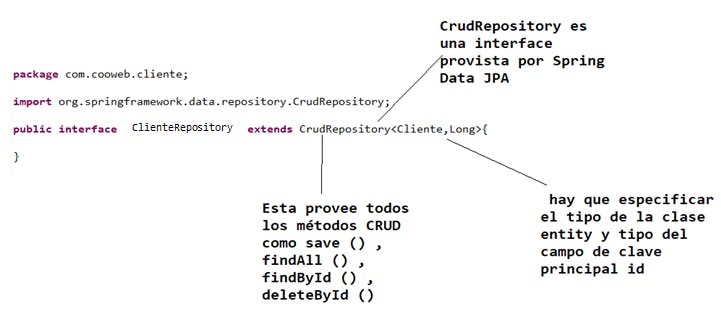
Create reposirory to cliente
package com.cooweb.cliente;
import java.util.List;
import org.springframework.data.jpa.repository.Query;
import org.springframework.data.repository.CrudRepository;
import org.springframework.data.repository.query.Param;
public interface ClienteRepository extends CrudRepository<Cliente,Long>{

}
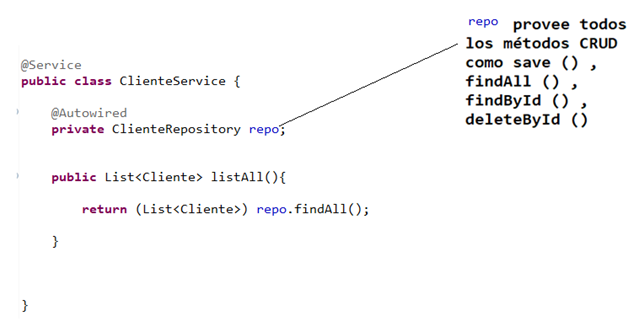
 Create service to cliente
serviceCliente.java
Create service to cliente
serviceCliente.java
package com.cooweb.cliente;
import java.util.List;
import org.springframework.beans.factory.annotation.Autowired;
import org.springframework.stereotype.Service;
@Transactional
@Service
public class ClienteService {
    @Autowired
    private ClienteRepository repo;

    public List<Cliente> listAll(){
            return (List<Cliente>) repo.findAll();
    }
    public void save(Cliente cliente) {
        repo.save(cliente);
    }
     public Cliente get(Long id) {
            return repo.findById(id).get();
        }

     public void delete(Long id) {
            repo.deleteById(id);
        }
}
Update Controller to list table records
package com.cooweb.cliente;
import java.util.List;
import org.springframework.beans.factory.annotation.Autowired;
import org.springframework.stereotype.Controller;
import org.springframework.web.bind.annotation.RequestMapping;
import org.springframework.web.servlet.ModelAndView;
@Controller
public class ClienteController {
   @Autowired
    private ClienteService clienteService;
    @RequestMapping("/")
    public ModelAndView home() {
        ModelAndView mav = new ModelAndView("index");
        List<Cliente> listCliente=clienteService.listAll();
        mav.addObject("listCliente", listCliente);
        return mav;
    }
}
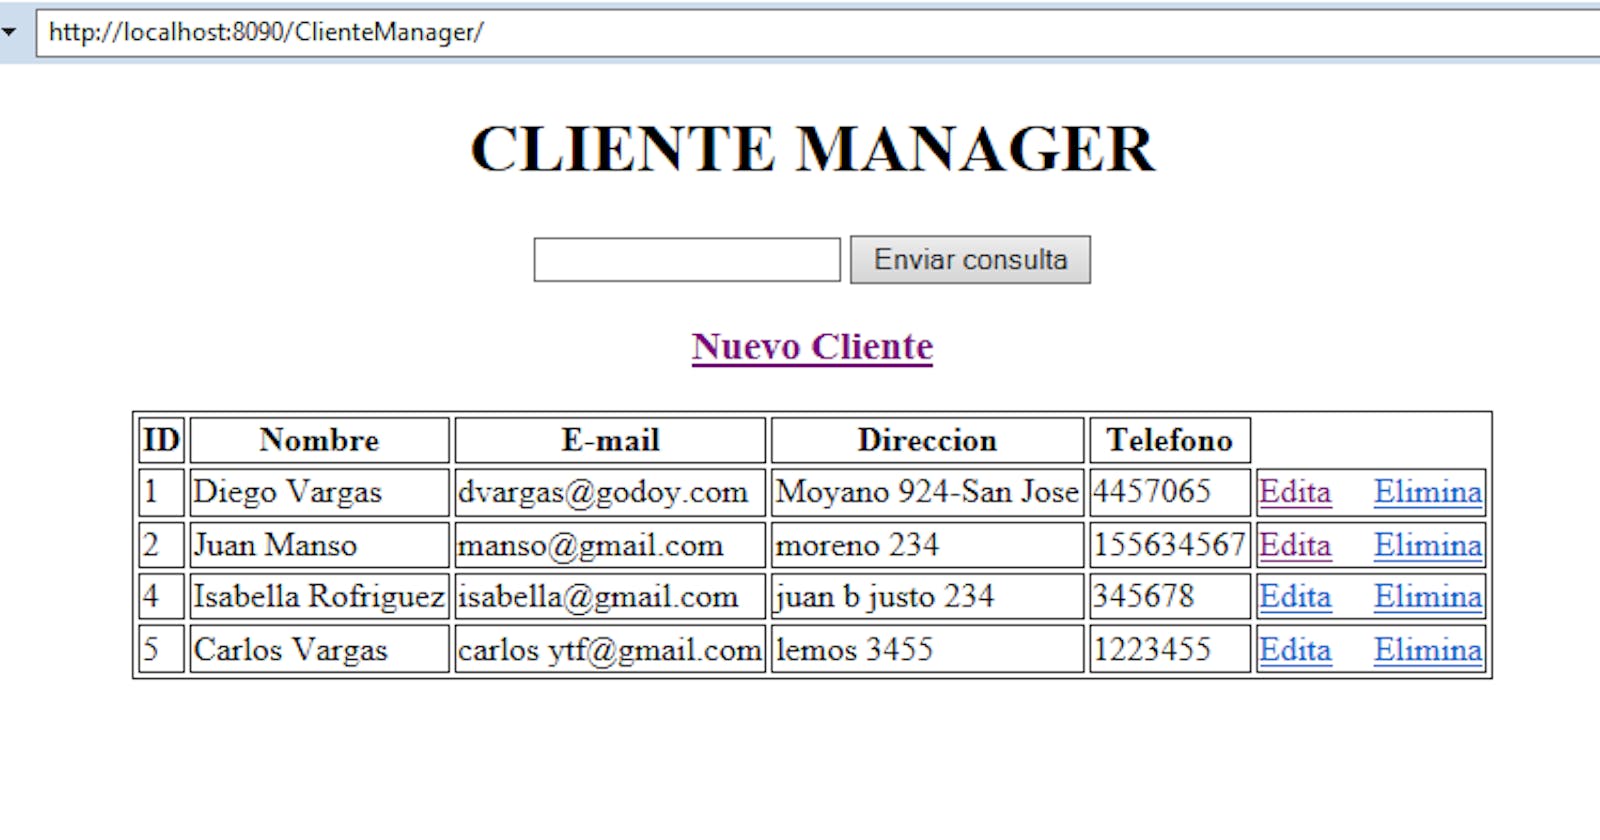
 Update index.jsp to list table records
<%@ page language="java" contentType="text/html; charset=ISO-8859-1"
pageEncoding="ISO-8859-1"%>
<%@ taglib uri="http://java.sun.com/jsp/jstl/core" prefix="c"%>
<!DOCTYPE html>
<html>
<head>
<meta charset="ISO-8859-1">
<title>Insert title here</title>
</head>
<body>
<div align="center">
<h1>CLIENTE MANAGER</h1>
<form method="get" action="search">
<input type="text" name="keyword" /> <input type="submit"
name="Search" />
</form>
<h3>
<a href="nuevo_cliente">Nuevo Cliente</a>
</h3>
<table border="1" >
<tr>
<th>ID</th>
<th>Nombre</th>
<th>E-mail</th>
<th>Direccion</th>
<th>Telefono</th>
</tr>
<c:forEach items="${listCliente}" var="cliente">
<tr>
<td>${cliente.id}</td>
<td>${cliente.nombre}</td>
<td>${cliente.email}</td>
<td>${cliente.direccion}</td>
<td>${cliente.telefono}</td>
<td>
<a href="edit?id=${cliente.id}">Edita</a>
<a href="delete?id=${cliente.id}">Elimina</a>
</td>
</tr>
</c:forEach>
</table>
</div>
</body>
</html>
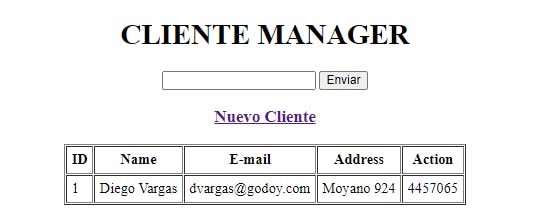
RUN PROJECT
localhost:8090/ClienteManager
SADSADSASDSA
6-Code to ADD new Client
To add a new client we need 2 methods in the controller. The first is to show the new customer form:
@RequestMapping("/nuevo_cliente")
    public String agregaClienteForm(Map<String, Object> model) {

        Cliente cliente=new Cliente();
        model.put("cliente",cliente);
        return "nuevo_cliente";
    }
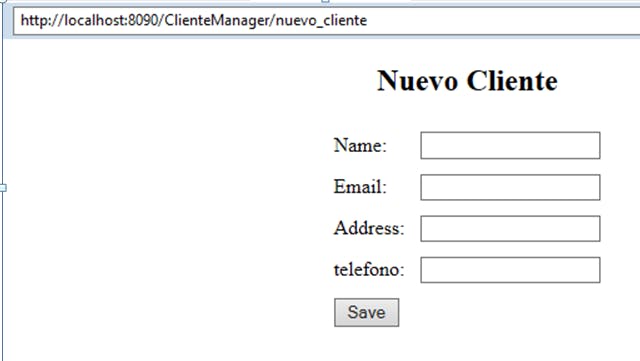
We create the newclient.jsp page with the following code:
<%@ page language="java" contentType="text/html; charset=ISO-8859-1"
    pageEncoding="ISO-8859-1"%>
<%@ taglib prefix="form" uri="http://www.springframework.org/tags/form"%>
<!DOCTYPE html PUBLIC "-//W3C//DTD HTML 4.01 Transitional//EN"
    "http://www.w3.org/TR/html4/loose.dtd">
<html>
<head>
<meta http-equiv="Content-Type" content="text/html; charset=ISO-8859-1">
<title>New Customer</title>
</head>
<body>
<body>
    <div align="center">
        <h2>Nuevo Cliente</h2>
        <form:form action="save" method="post" modelAttribute="cliente">
            <table border="0" cellpadding="5">
                <tr>
                    <td>Name: </td>
                    <td><form:input path="nombre" /></td>
                </tr>
                <tr>
                    <td>Email: </td>
                    <td><form:input path="email" /></td>
                </tr>
                <tr>
                    <td>Address: </td>
                    <td><form:input path="direccion" /></td>
                </tr>
                <tr>
                    <td>telefono: </td>
                    <td><form:input path="telefono" /></td>
                </tr>
                <tr>
                    <td colspan="2"><input type="submit" value="Save"></td>
                </tr>
            </table>
        </form:form>
    </div>
</body>
</body>
</html>
And the second method of the controller is to handle the Save button on this form:
@RequestMapping(value = "/save", method = RequestMethod.POST)
    public String saveCustomer(@ModelAttribute("cliente") Cliente cliente) {
        clienteService.save(cliente);
        return "redirect:/";
    }
Click the link New Customer in the home page, you should see the new customer form looks like this:
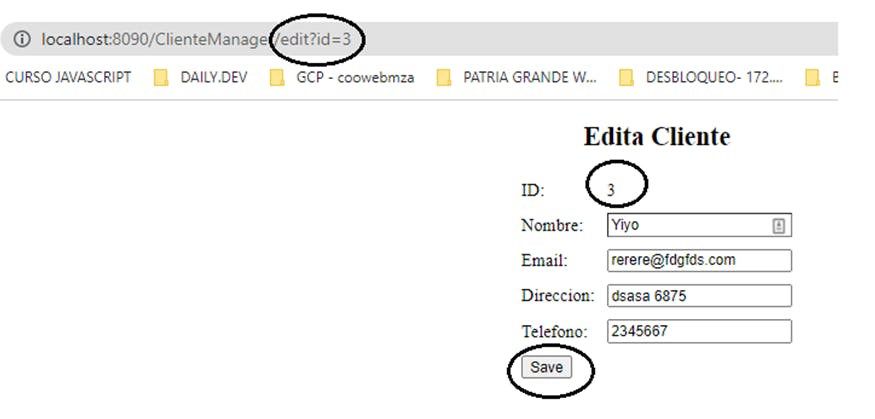
7-Code to EDIT new Client
To Edit a client we need to create the following method in the controller:
@RequestMapping("/edit")
    public ModelAndView editaClienteForm(@RequestParam long id) {
        ModelAndView mav = new ModelAndView("edit_cliente");
        Cliente cliente = clienteService.get(id);
        mav.addObject("cliente", cliente);
        return mav;
    }
For this method to work we must create a page called client_edit.jsp
<%@ page language="java" contentType="text/html; charset=ISO-8859-1"
    pageEncoding="ISO-8859-1"%>
<%@ taglib prefix="form" uri="http://www.springframework.org/tags/form"%>
<!DOCTYPE html PUBLIC "-//W3C//DTD HTML 4.01 Transitional//EN"
    "http://www.w3.org/TR/html4/loose.dtd">
<html>
<head>
<meta http-equiv="Content-Type" content="text/html; charset=ISO-8859-1">
<title>Edita Cliente</title>
</head>
<body>
    <div align="center">
        <h2>Edita Cliente</h2>
        <form:form action="save" method="post" modelAttribute="cliente">
            <table border="0" cellpadding="5">
                <tr>
                    <td>ID: </td>
                    <td>${cliente.id}
                        <form:hidden path="id"/>
                    </td>
                </tr>
                <tr>
                    <td>Nombre: </td>
                    <td><form:input path="nombre" /></td>
                </tr>
                <tr>
                    <td>Email: </td>
                    <td><form:input path="email" /></td>
                </tr>
                <tr>
                    <td>Direccion: </td>
                    <td><form:input path="direccion" /></td>
                </tr>
                <tr>
                    <td>Telefono: </td>
                    <td><form:input path="telefono" /></td>
                </tr>
                <tr>
                    <td colspan="2"><input type="submit" value="Save"></td>
                </tr>
            </table>
        </form:form>
    </div>
</body>
</html>
And we add the functionality in the table of the index.jsp
<td>
<a href="edit?id=${cliente.id}">Edita</a>
<a href="/delete?id=${cliente.id}">Elimina</a>
</td>
(notese que coloque edit?id sin barra /) en algunas configuraciones de IDE eclipse lo toma sin barra y otros con barra "/edit?id" run project
8-And finally we add the method DELETE client
To implement the delete customer feature, add the following code to the CustomerController class:
@RequestMapping("/delete")
    public String eliminaClienteForm(@RequestParam long id) {
        clienteService.delete(id);
        return "redirect:/";
    }
Click the Delete link next to a customer in the home page, it will be deleted and the list is refreshed. Estructura del proyecto
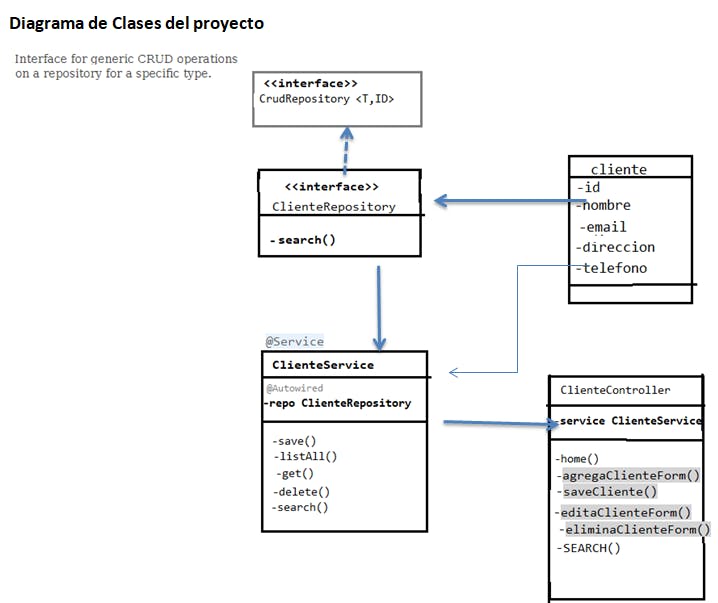
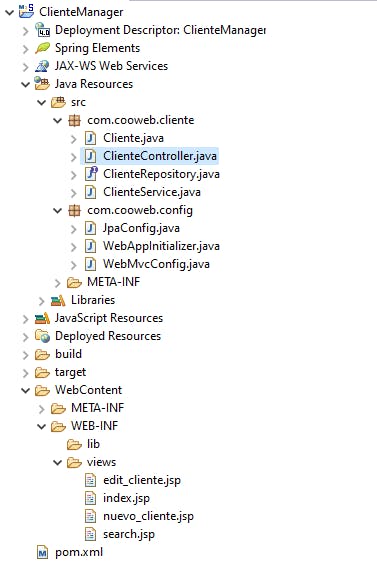 Diagrama de Clases del proyecto
That's how to develop a Spring MVC web application using Spring Data JPA for the data access lay. You've seen Spring Data JPA greatly simplifies the code we need to write. Queda pendiente implementar la funcion Buscar. Lo dejo para que el lector investigue en este tutorial: codejava.net/frameworks/spring/spring-mvc-s.. THANKS!!!